Manage E-mail Servers
This option, in the Advanced E-mail Settings of the E-mail activity and E-mail tab of the Route Entry to User, Route Entry to Group, and Route Entry to Folder activities allows you to add and modify e-mail servers.  Show me what this looks like.
Note: You can use any SMTP e-mail server with the E-mail activity.
To Manage E-mail Servers
- Click the Manage e-mail servers link from the Advanced E-mail Settings dialog box.
- A list of configured e-mail servers is shown in the Referenced Object Manager dialog box. The dialog box shows which e-mail server is set as the default server, and how many activities in this workflow use each e-mail server (References).
- Add or Edit one or more e-mail servers.
- When all desired e-mail servers(s) have been added or modified, click Close.
To Add an E-mail Server
- In the Referenced Object Manager dialog box, click Add.
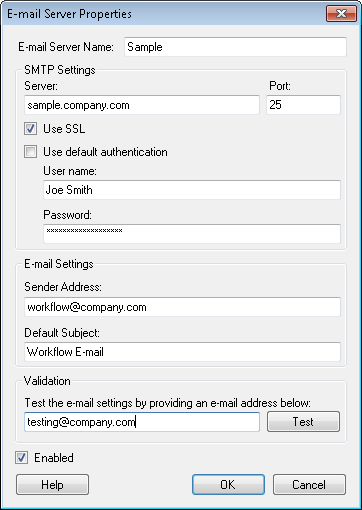
- In the E-mail Server Properties dialog box, next to E-mail Server Name, give the configuration a unique display name. This name is necessary to distinguish between multiple e-mail servers.
- Under SMTP Settings, define your e-mail server and port. Only specify a port if you need to use a non-standard e-mail port. (The standard port is 25, which will be used unless you specify a different port.)
- Optional: Select Use SSL if you want to secure the connection between the Workflow Server and e-mail server.
- Configure your authentication settings.
- Select Use default authentication to authenticate using the same account as the Workflow Server service.
- Clear Use default authentication to specify the user name and password used to authenticate to the e-mail server. (This authentication may be optional because some e-mail server's do not require a user name or password).
- Under E-mail Settings, specify the e-mail address that will appear as the sender's e-mail address for mail sent from this e-mail server.
- Optional: Provide a default subject for e-mails sent from this e-mail server.
- Optional: In the Validation section, test the settings you configured by providing an e-mail address to send a test e-mail to and clicking Test.
- Select the Enabled checkbox to enable the e-mail server, or clear the Enabled checkbox if you want to disable the e-mail server. You may have multiple e-mail servers and want one disabled while you configure another one.
- When finished, click OK.
To modify an E-mail Server
- In the Referenced Object Manager dialog box, select an e-mail server.
- Click Edit.
- Make desired changes to the e-mail server properties.
- Click OK.